EazyDraw Raw App For Help Brushes (Design) EazyDraw Raw App For Help

EazyDraw Brushes Palette
Related Information
Brushes Palette
Use Brush
Brush Scratch Pad
Brush Transform
Pencil
Brush Tool
Brush Methods
Artistic
Stretch
Stretch Between
Stretch Proportional
Interval Brush
Sequence Brush
Repeat Sequence Brush
Reflect Sequence Brush
Cycle Brush
|

EazyDraw for macOS palette controls Brush Design

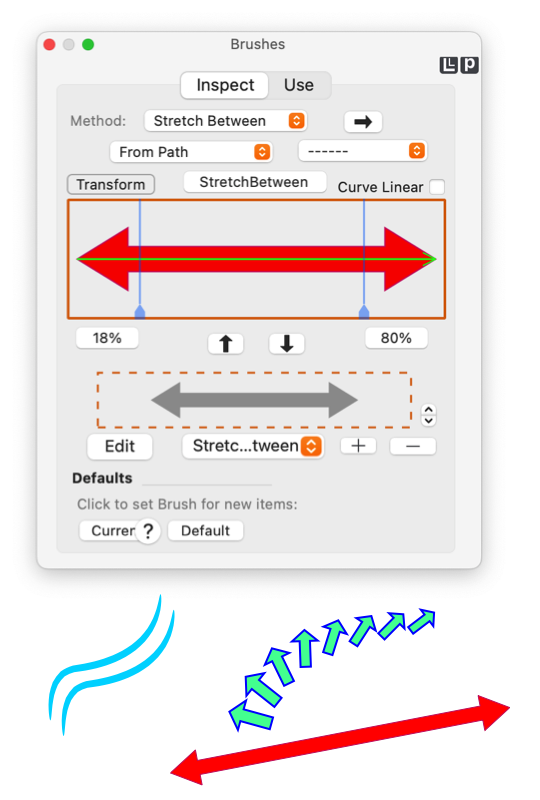
The upper area of the Inspect Tab on the Brushes palette is focus for the design and implementation of a Brush. These user interface elements will associate a Brush Stroke Path to a specific brush method and assign the resulting brush to a master path of a graphic on an EazyDraw drawing.

This inspector will show the specific settings of the assigned Brush of a graphic selected on an EazyDraw drawing. This inspection and application process follows the same procedures and rules as found with other graphic parameter palettes, such as Arrows or Dashed lines. A Brush is inherently more complex than an Arrow or Dashed line, so one should be familiar with the generalized use of parameter palettes before experimenting with Brushes.

The presented parameters and appearance of the Brush Inspector View changes significantly with the choice of Method. The specific design choices will be quite different for the various brush methods. Specific Help pages are provided for each method. This Help page will explain the design usage elements that are common for all brush methods.

These elements are found on the Inspect tab of the Brushes palette which is accessed from the Tools main menu, about one third down from the top.
How to Turn Off a Brush. First thing to learn will be how to remove a brush from a graphic. Select the graphic(s) on the drawing then use the top popup menu and select None for the method. This will return the graphic to a normal non-brush-stroke state.

The two arrow buttons, seen in the middle of the palette, are used to transfer the Brush Stroke Path between the active Brush and the scratch pad. The design of a brush begins by bringing (the upward arrow button) a Brush Stroke Path "up" to become the active Brush. An initial guess for the brush method is applied based on recent activity and the shape and configuration of the Brush Stroke Path - this is only an initial convenience guess and will likely need manual selection.

The key parameter for Brush design is the Brush Method. This is selected with the top popup menu. The presented parameters and appearance of the Brush Inspector View changes significantly after the Method is selected. Changes, such as Method, are applied directly to selected graphics on the EazyDraw drawing. Only a portion of your design inspection will focus on this palette and the Brush Design View. The final appearance of the brush design is seen on the EazyDraw drawing and target graphic.

The central brush viewing area is called the Brush Design View. This will display the specific Brush Stroke Path and associated design parameters specific to the selected Brush Method. This display may or may not actually represent the appearance of the brush in use, a typical target graphic on an EazyDraw drawing should be used for the actual design appearance of the brush.

A brush should be assigned a name. This is inspected and edited with the text box centered just above the Brush Design View. The name is initially assigned from the name of the Brush Stroke Path. Since one Brush Stroke Path may be used for several brushes it will be a good practice to assign a descriptive unique name for the Brush. This will be the name used in the Use table, so it is good to name brushes during the design step.

There are two logical approaches for assignment of the Color and Style used when drawing the Brush path. The Color and Style can be though of as being the same as the "line" style of a graphic and therefore defined by the normal Color and Style palette. Or the Color and Style could be thought of as coming from the originating Brush Stroke Path, assigned and fixed early in the brush design process, not at the time of use. It turns out that both are needed in various brush designs, EazyDraw supports both. The Style popup menu is used to make the choice for this parameter.

The arrow button near the top right is used to send a completed brush design to the brush Use table. Click the button to place the full brush design (Brush Stroke Path, Brush Method, all associated parameters) to holding slot in the brush Use container. The brush, identified by the assigned name, is then available for quick convenient use from the Use table. Follow the documentation link to the left to learn more about using the brush.

The popup menu just below the right arrow button will show, by name, the current contents of the Use table. This popup will indicate when the current brush design matches a Brush found on the Use table.

EazyDraw ships with a small set of stock Factory brushes. These are intended to show the use of various parameters for the different brush methods. This set will initially populate your Use table and this popup menu. If they have been removed or partially deleted the factory set may be regenerated with the selection found a the bottom of the popup menu. The "Factory" selection will not show if all Factory brushes are present in the Use table.

EazyDraw Help Pages example

Changes, such as Method, are applied directly to selected graphics on the EazyDraw drawing. Only a portion of your design inspection will focus on this palette and the Brush Design View. The final appearance of the brush design is seen on the EazyDraw drawing and target graphic. Even if you are simply designing a brush for future use, a typical graphic for the intended use should be drawn and used as an inspection target on the drawing.

Notice that the "up front" assignment of Color and Style to the Brush Stroke Path is needed if the design employs multiple paths that require different colors or opacities. This is one reason both methods for Brush Style are needed.

The use table popup (just below the right pointing arrow button) will assist in checking the brush of a graphic to see if that brush corresponds to a defined brush in the use table. Select a graphic with a brush and EazyDraw will compare that brush against all the defined and named brushes in the use table, if a match is found it shows as the selection for the popup menu. Notice that the inspection target (the brush on the drawing) might have a different name, in this case the name assigned on the drawing shows in the Name text area (top center just above the design view) and the name used in the Use table will show on the popup menu.

Paths in the Use list are saved when EazyDraw quits and restarts. The paths are save in a property list text file in the Application Support folder assigned to EazyDraw by macOS. This information will not normally move from system to system or to future installations of EazyDraw. Use Export capability found at the bottom of the Use Tab table to generate a persistent archive for important tables of brushes.