EazyDraw Raw App For Help Arrow Reference
(Offset or Relief)
EazyDraw Raw App For Help

EazyDraw Arrow Reference
Related Information
Arrow Palette
Arrow Color
Arrow Shape
Arrow Location
Color Well
Palette Aids
Defaults
|

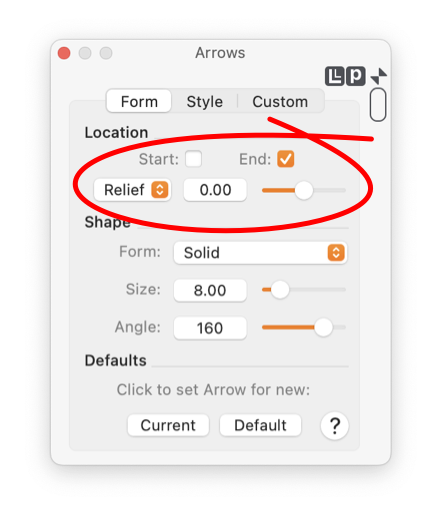
EazyDraw for macOS palette controls There are two methods available for determining the precise position of the arrow with respect to the exact end of the line, path, or curve. The choices are "Relief" or "Offset". The choice is managed with the popup menu shown circled to the left. The choice of Offset leaves the end of the line at the specified point. The choice of Relief will place the tip of the arrow at the defined end of the line and may shorten (or extend) the drawn line to present a clean representation of the arrow.

The discussions here will use the term "line" but everything applies for any shape host, be that a line, path, curve or closed shape.

The issues and capabilities discussed here are more relevant when the width of the host line is larger and might interfere or overlap an arrow. If an arrow is drawn as an open unfilled shape, this capability may be important.

The exact reference point of an arrow is usually the "tip" but this can vary with shape. For Custom shapes the reference point is defined as the first point of the Bezier path unless a different reference is set with the Custom arrow view on the Custom tab.

The Arrow palette is accessed from the Tools main menu. The Relief choice is made on the Form tab of the palette.
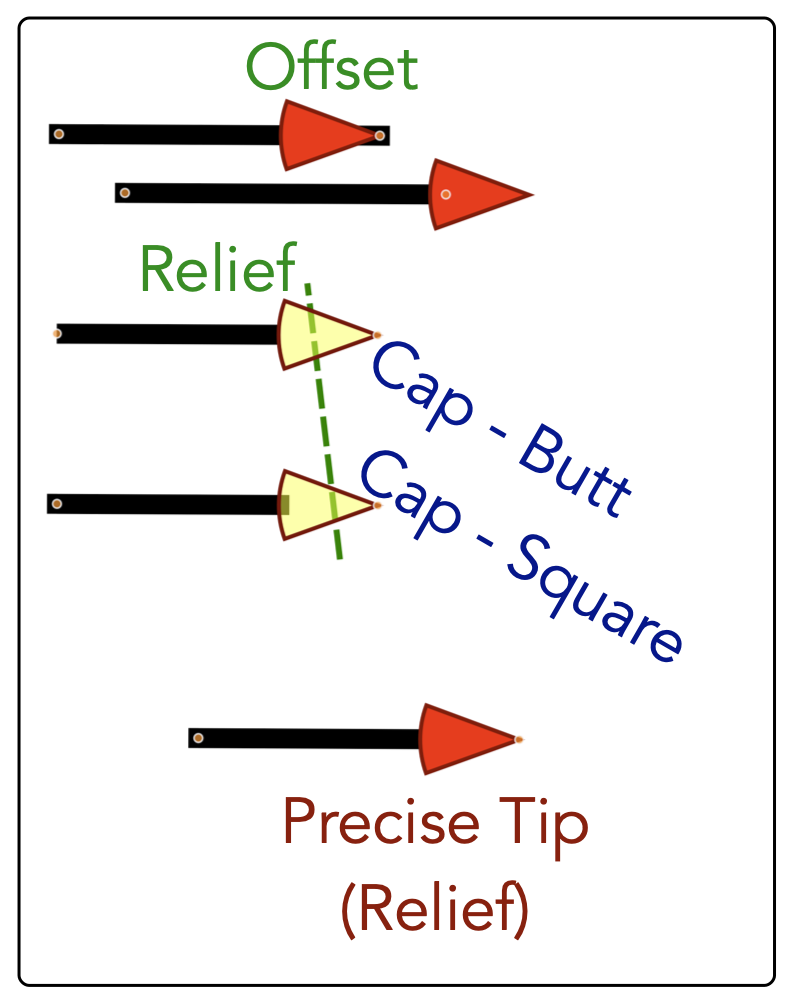
If the Reference is set to Offset then the end of the line is drawn as specified by the lines end point coordinates. The arrow is then positioned with respect to this end point. The offset setting specifies a shift along the host path, relative to the end point.

If the Reference setting is Relief then the tip of the arrow is positioned exactly at the specified end point coordinate of the host line. The host line is then drawn with "relief" as specified by the relief / offset value. Normally this will cause the host line to as drawn to terminate at the base of the arrow. This geometry will prevent the host line’s finite pen width from interfering or overlapping the arrow shape. Thus giving a clean appearing arrow with accurate placement of the tip position.

The Offset or Relief parameter value is specified with the units for the palette. A value of zero will place the tip (or more precisely the reference point) of the arrow shape exactly at the end of the line. If the Offset reference technique is used, the offset value will shift the arrow tip by the specified amount.

If the Relief reference technique is used, the tip of the arrow is always placed at the exact end point of the line, changes to the Offset / Relief length will not move the arrow. In this case a value of zero defines a relief distance that exactly matches the arrow shape. In the case of the typical Solid arrow, the drawn line will end at the base of the arrow -- for a value of zero. You may adjust the relief distance, relative to this base value, this will adjust the drawn end of the line. Positive values will extend the line "back" along the host path. Negative values will extend the line "along" the host path, it is even possible to extend the drawn line past the point of the arrow tip.

EazyDraw Help Pages example

The example to the right, the top line with the red arrow, indicates the problem that the Relief option solves. There you see the nice sharp tip of the arrow drawn exactly at the "end" of the line, but the line with finite thickness is exposed under the arrow shape leading to a less than desirable appearance.

There are two solutions, the next line to the right shows the arrow shape shifted past the end of the line, now we have a nice clean appearance. In many cases this is the desired representation.

In some cases the "Offset" solution is not desirable because now the tip of the combined line and arrow is extending past the defined end of the line, creating a possible inaccuracy or perhaps an undesired overlap of "what the arrow is pointing to". The Relief choice is the solution for this situation. The bottom line of the illustration to the right uses the Relief setting, the tip of the arrow is placed precisely at the line end point and the line itself is drawn with relief for the desired clean appearance.

The middle examples (to the right) draw the arrow shape with a partially transparent fill. This allows us to see the actual relieved line as drawn. Notice that the Cap style for the drawn line can be important for open or partially transparent arrows. The computed relief values (that used when the relief parameter is set to zero) defines the exact end of the drawn line. As defined by the Mac and postscript drawing conventions, a line Cap style of Square will extend the inked line one half a line width past the end point. Choose Butt for the cap style to get the desired (in most cases) exact clean inking of the line and open arrow shape.