|
|

|
|
 Shapes Along a Path
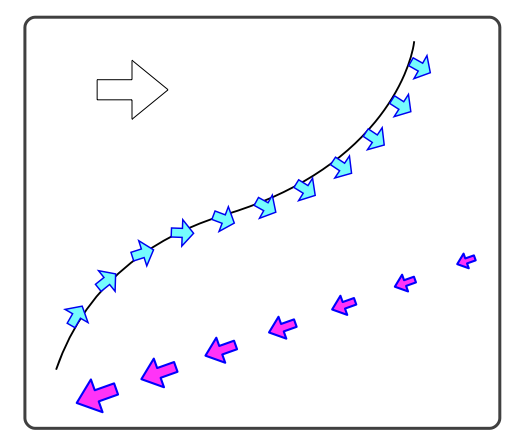
Any Bezier path may be applied in a sequence along the path or curves of a Bezier graphic. A common term for these shapes are "Brushes", but we will just call them arrows, as they are an extension of the general "Arrow" on a line concept. The Along tab of the custom shape view is used to manage this drawing technique.
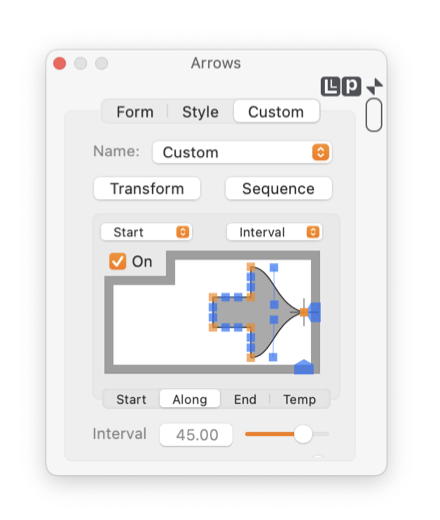
The Along tab view is accessed from the Arrow Palette by clicking the Custom tab (at the top of the palette) and clicking the Temp tab of the Custom shape editing view. This tab is automatically selected when a custom shape is applied to the start or end of a target graphic.
|
The "On" button is used to apply this brush technique to a Bezier graphic. Check the box to apply a sequence of custom arrow shapes along a path. This technique only applies for custom arrow shapes.
You may edit the custom shape, in-place, by click and drag of a vertex or control point handle. These are the small light brown or blue rectangles overlaid on the shape. Editing is similar to the editing procedure on a normal EazyDraw drawing. If more editing capability is required (such as adding or removing a vertex) drag the shape to an EazyDraw drawing window and continue editing with the full EazyDraw capability. Then drag and drop the shape back on this view.
Every arrow shape has a defined reference point. This reference is used to define a unique mating position of the arrow shape and the target Bezier path, the point where the arrow is "attached". The default reference position of a custom shape is the first point of the Bezier path. You may shift this reference by using the two blue tab handles found in the right and bottom margins of the editing view. The reference position may be shifted, but is constrained to remain inside the bounding rectangle of the custom shape. Larger shifts are done with the full Transform. Move the reference with the click and drag of one of the tab-handles. The position is shown with the light blue crossing lines.
An "Along" sequence has an additional reference point, one that defines the beginning of the sequence of shapes. The popup menu just above the On button is used to define this master reference point. Three choices: Start, Center, and End are available. This reference is the stationary point, along the target path, from which the sequence of shapes emanates.
Two methods are provided for determining the spacing of the sequence of arrow shapes, Interval or Count. The method is selected using the popup menu, top-right corner of this tab view. The Count method will place, at even intervals from the master reference point, count number of shapes along the full length of the target graphic. The Interval method will space the shapes at a specified interval, thus providing more arrow shapes for longer path lengths.
The text field and slider at the bottom of the palette control the Interval or Count of the arrow sequence along the target path. The value controlled depends on the popup menu selection, as described in the previous paragraph.
|

You may apply an arrow at each vertex of a curve. This is a simpler "along" technique. It applies only for the standard arrow forms. The user interface for this approach is found at the bottom of the Style tab on the Arrows palette.
The contextual menu provides access to the standard EazyDraw arrow forms, so they is used as a starting shape for customization. The standard EazyDraw arrow forms do not respond to this "Along" technique, you must first assign the standard shape as the Along custom shape, using the contextual menu.
Color and style selections such as fill color, stroke width, line color are not reflected on the in-place editing view. These are managed by parameters on the
Style
main tab view. These are applied to the shape as attached to a target graphic and shown on the main drawing. Shapes shown on this view do not reflect choices for these attributes.
The Transform button is used to apply a full Affine transform to the arrow shape. Use this to position, orient, scale, or shear the arrow shape. Note, the transformed shape is not reflected in this editing view, this view always shows the original starting shape. The transformed shape is viewed interactively on the main EazyDraw drawing.
Two separate transforms are available for the Along technique, the first is the normal transform to morph and position the custom shape as desired, the second is called the Sequence transform. This second transform can be thought of as a "delta" transform applied sequentially to each arrow shape drawn. An example of the sequence technique would be to make the series of shapes smaller and smaller as if disappearing in the distance.
A starting shape is moved to the Temp position with the copy then paste selections found on the contextual menu for this tab view. Control click to access.
|


