

|

|

|

|
|
Snapping - Tangent and Perpendicular
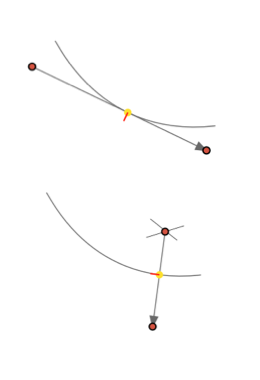
Snapping is provided for straight elements (lines, paths, and polygons) relative to curved elements. In particular this capability provides an easy way to draw a line tangent to a curve through a defined point. There are two variations of this technique, one snaps the line to the tangent of a curve the other orients the line perpendicular to the curved element. There are a convenient short-cut for these actions. Press and hold the key "t" ( "p" for perpendicular ) to enter the Tangent snap mode. The key is pressed in conjunction with an on-screen interactive vertex (handle) adjustment. The snap is activated if a vertex of the straight element is in motion--not when editing the curved element. The key "n" for the mathematical term "normal" is equivalent to the "p" key. This may be easier to remember by those with a math or physics background. These snapping actions are accessed from the Grid and Guides Menu Both of these interface elements are found near the bottom of the Grid and Guides submenu. IMPORTANT: Vertex Snapping must be enabled for use of this tangent and Perpendicular capability. The "vt" button on the Attributes is the easiest way to turn on Vertex snapping.

This technique is not used to orient two straight graphic elements. Use Guidelines snapping found on the Grids and Guides (and the Attributes bar) to orient two lines to be parallel or perpendicular to each other. The example to the right shows how Guidelines apply to perpendicular orientations of straight elements. The Pin and Lock properties will likely be useful after your tangent (or perpendicular) path is oriented. Pinning the angle of the line after snapping will allow further adjusting without destruction of the desired orientation. The result when snapping a line tangent to a curved path does create an intersection, as detected with the EazyDraw Knife tool. This can be useful for construction of a smooth transition of a line to a curve. There is another method for constructing tangents and Perpendiculars to a curve. The other method is available when the Tape Measure cursor is in use. In the Tape Measure mode, tangents are shown live when the cursor is on a curve. When the tangent indicator is showing, typing the "t" key will "drop" a tangent line on the curve. This method is useful when a tangent is needed "from" a particular point on a curve. The "p" key is used to drop a perpendicular in this mode. |