|
|

|
|
User Libraries: Button Presentation
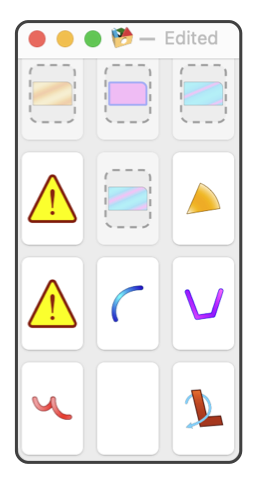
Libraries are special drawing files that contain graphic elements, property containers, or drawing tool references for use as specialized drawing tools. A library palette has 3 different presentation formats; Name, Element, and Button (or Icon). This documentation page discusses the use of the Button or tool presentation form of the Library palette. This view presents the library as a functional tool palette that is used just like the built-in tool palettes provided with EazyDraw.
The user library palette may be resized as desired. The lower right corner of the palette is used to change the size of the palette. The palette will always show all elements of the library. The palette may be vertical (tall and narrow - by column) or horizontal and (short and wide - by row). After a resize, a small is presented top left of the palette to allow setting of the number of columns for the vertical mode or number of rows when in the horizontal mode.
In all cases the lower right button of the palette is "return to library mode" button, depicted as the letter L for library with a return icon. Click this button to return to either the Name or Element presentation mode for design, configuration and management of the library’s content.
The
User Tools
submenu provides another method for creating a custom user tool palette. This approach will not support unique custom shapes and symbols that you have created. A User Tools palette will support all of the built-in EazyDraw tools, including editng tools such as the Arrow tool or tools from the Zoom or Select tool paletts. The Custom tool palettes created via a User Library do not support the Editing tools.
This, the Button presentation view of a library palette is accessed by first opening a library using the Libraries main menu. If the library is in the Name or Element presentation format, use the popup menu at the bottom of the palette to select this, the Button, presentation form.
|
The buttons provided behave in a manner similar to the normal EazyDraw tool palettes. Click a button to make that graphic the current creation graphic for the current front EazyDraw drawing window. Then use the mouse to move the cursor over the drawing window, the cursor changes to the
Rectangular Creation
cursor. Then click and drag on the drawing window at the desired target location for the new graphic. The library graphic element associated with the tool button is created on the target drawing. It is drawn enclosed by the rectangle specified by the drag motion. You may move in any direction, the rectangle’s content will flip or mirror to follow your motion. The process is completed when the mouse button is released.
The buttons are by default one-shot in nature. After one graphic is created the selected button is cleared and the main arrow tool cursor is re-activated. A double click of a button will override this behavior. After a double click the target button remains active, in this way you may create several copies of the same library element. This "sticky" mode must be overtly cleared by clicking another EazyDraw tool, typically by clicking the default Arrow tool.
Some library elements may not represent actual graphics, they may be containers of parameter settings. In this case the button icon is shown with a light yellow backdrop and bluish dashed inner border. These buttons have a different behavior. First at least one graphic on the EazyDraw drawing window needs to be selected. When a graphic is selected, the library element’s represented parameter settings are applied to the target graphic by a single click of the button.
Some library elements may represent other "built-in" EazyDraw tools. You may add one of these built-in tools to a library palette by dragging the tool from the corresponding tool palette to a location on this library palette. These tools retain their standard creation behavior when added to a library tool palette - they work just the same as they do from their fixed standard tool palette. They do not adapt the Rectangular creation mode. These parameter set containers are managed by the settings on the
Transfer Palette
which is found on the Format main menu. The library needs to return to the Name or Element presentation mode in order to manage these settings for the graphic element associated with the button.
Use drag and drop to move elements to different locations in the library. Simply click and drag a button to the desired location.
This tool palette is resizable, use the small lined triangle area, bottom right of the palette, to click and drag to adjust the size of the palette. After a resize, a stepper control is shown on the top left of the palette. This stepper is used to change the number of columns, when in the vertical mode, or number of rows in the horizontal mode. The horizontal or vertical mode is determined size the palette and whether it is wider than it is tall. When you are happy with the number of columns (or rows) use the OK button to dismiss the button. The size of each tool button is adjusted to fill the area of the palette. In all cases all elements of the library are displayed in this mode, if necessary buttons will drawn smaller and more columns or rows will be added to place buttons for all elements.
Drag and Drop can be used to rearrange the order of the buttons on your palette. Drag and drop can be used to copy a button over to another user library palette. Drag and Drop does may not be used to drag the associated graphic element to an EazyDraw drawing. If you desire to place library elements on drawings via drag and drop, use the Element presentation for the library palette.
The last button, lower right, shown on the palette is a constant for all library tool palettes. It is not defined by a library element. Use this button to return to either the Name or Element presentation view of the library. A single click will accomplish the mode change. You will probably want to use one of these other modes when building or making changes to your library.
|
You may design your own icons for the standard EazyDraw tools. This is done easily by adding a built-in tool to a library. Then use the Name presentation mode to drop an icon of your own design on the icon button. Then your icon will represent the tool’s button when the library is in the tool button presentation mode.
The size of the library palette in the button mode is independent of the size of the palette when switched to the Name or Element presentation mode. This size is persistent, it is remembered when the library is closed and re-opened. The position of the palette on the desktop is the same for all 3 presentation modes, this is also remembered with a
palette layout
save and when you quit and restart EazyDraw.
The order of buttons corresponds to the order of elements in the library. Note that is you were to re-order a library with an alphabetical sort while n the Name presentation mode, the order of the tools in the Button presentation mode will change too.
To overtly save a library palette configuration you need to return to one of the other modes for your library. This means that if you resize in the tool button mode, or if you want to lock in the tool button mode for a library, you will need to make your changes then click the close button on this palette. Before closing the window EazyDraw will ask if you want to save the Library, select Save and the button form and layout will become the default mode for the library.
|


