|
The Tab Creation Cursor is used for drawing lines, paths, or curves that may have multiple segments. EazyDraw uses this method of creation for several different shapes. The Toolbar buttons for the shapes that use this method are shown below. The Tab Creation Cursor becomes active when one of these buttons is selected.
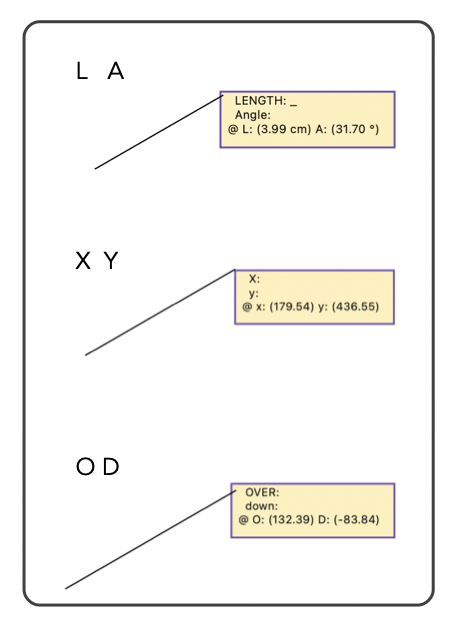
During graphic creation 6 keyboard keys are active to enter a hybrid numeric-interactive creation mode. The active keys are L, A, X, Y, O, D. Acceptance is case-insensitive. The key correspondence is: A, angle; L, length; X, x-cartesian-coordinate, Y y-cartesian-coordinate; O Over (delta X); D Down (delta Y). See below for description of this entry mode. However, experimentation is the best way to investigate and learn the use of this feature.
|
How to use the Tab Creation Cursor
|
|
There are two ways to create multiple segment paths with the Tab Creation cursor. The first is a combination of click and drag that uses the Tab key to advance to the next segment of the path or curve. The second method uses multiple sequences of click and drag, one click and drag sequence for each segment of the curve. There are no settings or preferences that control which method is used. The desired method is simply determined by your actions.
The Tab key method requires 2 hands but may be more convenient in some cases. To use this method keep the mouse key down and continue the drag operation until the curve is completely drawn. As you drag the mouse, click the Tab key whenever a new segment is needed. A vertex will be placed at the mouse location at the time of the key click. The drawing operation is completed when the mouse is lifted at the end of the drawing sequence.
After the initial mouse down click and after dragging is started: Six keys on the keyboard are active and will initiate a hybrid numeric-interactive creation mode. The A or L keys enter length - angle entry mode. The X or Y key enters Cartesian coordinate mode. The O or D key enters the over and down (delta X, Y) entry mode. An active cursor read-out attaches to the interactive mouse entry point. The numeric values are interactive and active. These mode accept numeric entry. Start typing a number to create a value. Use Tab to enter the value (if one is present) and tab entry to the other value. If only one value is entered, interactive mouse movement is still available but constrained accordingly. Type Return to finish.
In some cases it may be more convenient to use a sequence of individual click and drag mouse motions to specify the segments of the curve. In this case when the mouse key is released at the end of the first segment you will note that the Tab Cursor remains in effect. This is your visual clue that the curve is not complete. The next mouse down will begin a new drag sequence that will add the next leg of the curve. This cycle of click-drag may be continued until the desired number of path segments have been created. The process is completed with either a double click of the mouse or when the mouse moves off the window that contains the drawing. Sometimes flicking the cursor off the window is a convenient way to complete a curve and there is no chance of getting another segment if the double click is too slow.
|

The values displayed during the hybrid interactive mode are formatted according to the display parameter settings on the
Graphic Details Inspector
when nothing is selected. You have full control over displayed precision, decimal vs fraction, inclusion of units. The values entered are not restricted to the display precision, up to 12 decimal places are accurately accepted independent of display precision. The units for values entered are the drawing units (and scale if applicable).
Don't be concerned if the curve is not placed and sized exactly as desired during the creation procedure. You may easily
move and resize
the curve after creation. Undo and redo always works too. If you need to place the curve vertices at particular positions, this may be accomplished after the creation step by using the
Graphic Details Inspector
to modify the specific location of each vertex of the newly created curve.
Left handed users will find it more convenient to use the "Enter Key" instead of Tab. Enter is usually found on the right side of the key board. There is no preference to set for this feature. Either key will work. The first one clicked will be used for the rest of the creation procedure. The next time the other key is used if desired.
At any time you can step back one segment by using the Delete Key. Each click of the delete key will remove one vertex of the curve.
If the Tape Measure tool is active, when starting to draw a new line, then numeric read-outs display with the cursor.
|


