|
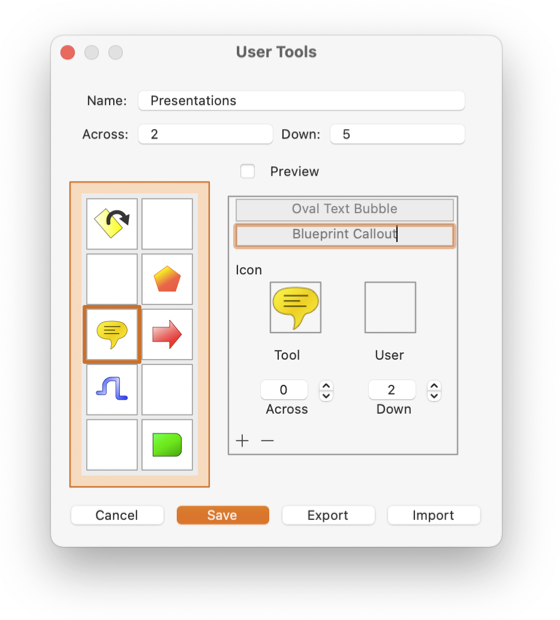
Name your tool palette using the top text box. This is the name that is shown on the User Tools submenu, it will be the menu entry that is used to open or close your custom tool palette.
The Across and Down parameters define the layout geometry for your tool matrix. This editing palette supports both a vertical (more rows than columns) and horizontal (more columns than rows) tool palette geometry.
This palette allows use of a custom tool icon. Note the two icon areas (center-right) on this palette. The one on the left is the standard EazyDraw icon. The one on the right is for an optional replacement, custom, user designed, icon graphic. The Preview check box determine which is shown on the inspection tool matrix (center-left) on this palette. When Preview is checked, the presentation will show the custom icon - just as it will appear when using the final custom tool palette.
The rectangle on the left (this will be across the center of the palette when working with a predominately horizontal tool bar geometry) is the working representation of the layout of your tool palette. Each box represents a tool location. Drag a tool from an EazyDraw tool palette to one of these squares to install the tool in that location on the palette The icon graphics shown will indicate the tool installed on each button. The blank display indicates that button is open, it will have no action when in use. The red bordering rectangle indicates the specific tool that is selected for inspection in the inspection elements on the right (this will be "below" for a horizontal toolbar).
The individual tool inspection area has a bounding rectangle. Elements in the area relate to an individual tool (not the full tool palette). Use the Across and Down stepper to navigate through the installed tools. Or click on a specific tool to select the tool. The red border indicates the tool in focus for inspection.
The two text boxes at the top of the inspection area are the tool tips for the tool button. The top text is the fixed internal EazyDraw tool tip, this is localize to the current language in use, this text is not editable. The box below provides input for a customized tool tip. Enter your own wording, in the language of choice. Your entry here will be the tool tip for the palette. Tool Tips are the short descriptive phrases that appear (usually with a yellow background) when the cursor is paused over a tool.
The two Icon squares provide inspection for the graphic icon that represents to the tool on the tool palette. The one on the left is the built in fixed EazyDraw icon (not editable). The one on the right is for a custom icon of your own design. Drag and drop your graphic on the box to the right to install a custom icon. Of course you may draw the icon using EazyDraw, simply drag and drop a grouped graphic from a drawing to the icon rectangle. Or the icon may be any standard graphic format, you could even drag an icon from a web page directly to the install rectangle.
The Minus button is used to remove a tool from the tool palette. The Selected tool is the one removed. No Undo support.
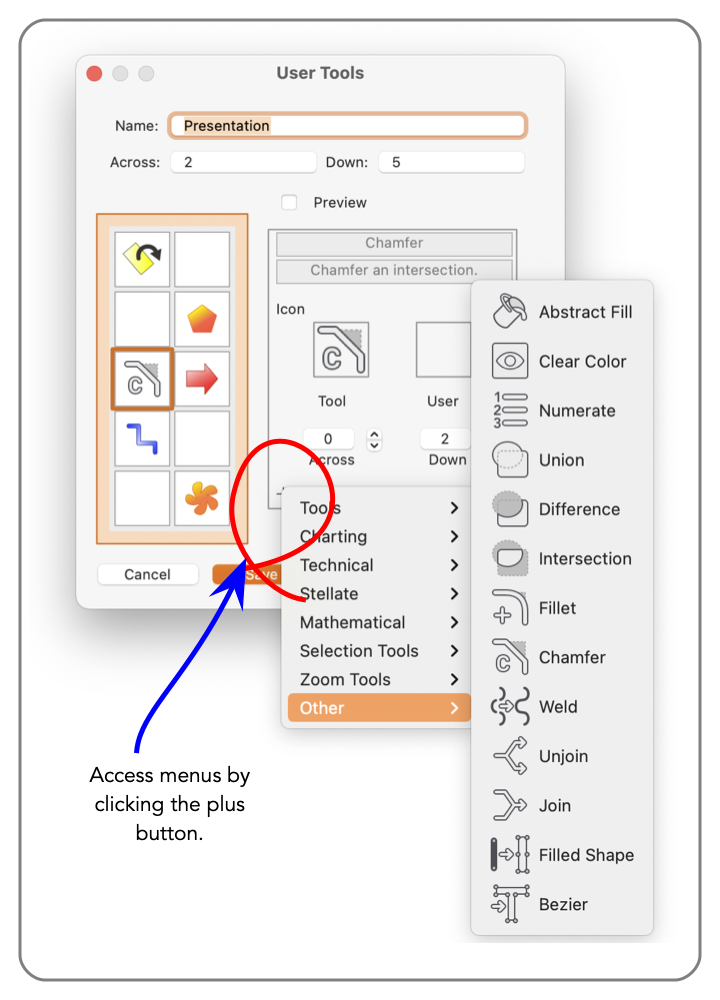
The Plus button provides an alternative to drag and drop for installing a tool. This popup menu with a heirachy of submenus presents a complete list of all tools supported for use on a User Tool palette. A tool chosen from the menu is installed to the selected tool button.
The Plus button popup menu provides access to additional tool-like actions. These are menu actions not found on any EazyDraw tool palette. These are available for customization to the drawing window toolbar. The "Other&qout; submenu allows these tools to be used on a User Tool palette.
The Cancel button (lower left) closes the User Tool editing palette, with absolutely no changes to palette. Note that this palette has no undo support. Use the Cancel button in situations where a set of changes is not working out.
The Save button is key - nothing really happens unless you do a Save. If a full editing session creates of modifies a user tool palette, this palette with the changes is not installed until Save is executed. If you do a Cancel, all of your changes evaporate.
Export and Import are used to archive and retrive a permanent representation of a User Tool palette. Export presents a file save dialog for selection of a name and location on your system (or iCloud) to save the User Tool file. The information is saved in a normal text file, formatted as XML as a macOS property list (pList). These files may be inspected with a text editor or the pList App.
|


