

|
Drawing Corners |

|
|
Use the "Corner Tool" (shown above) which is found on the Tools Palette to draw a 90 arc of a circle or ellipse. If the palette is not visible open it by selecting "Tools" from the "View" item of the "Main Menu". The new corner is drawn on EazyDraw’s front window. The desired window must be brought to the front before clicking on the tool.

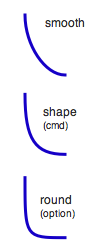
All corners are created with an orthogonal orientation that may be thought of as horizontal or vertical. After creation the orientation of the corner may be adjusted to any angle with the rotation handle that is shown with a light arc passing through the interactive editing handle. A light blue (factory default color) interactive editing handle is provided for adjusting the shape of the corner. This handle provides a continuous adjustment from the Round shape through the Shaped to the Smoothed values. If the shift key is applied while adjusting the settings will lock to the three discrete values. This graphic shape only provides arc sweeps of 90 degrees such as needed to form corners for orthogonal - perpendicular lines. The more generalized Arc and Pie tools are needed for arcs of continuously varying sweep angles. A common use for this tool is to connect and form a corner for two orthogonal lines. Since the snapping focus for this shape is the ends of the arc, these will easily snap to and connect the ends of the lines. If it is needed to provide a joining corner for two lines that are not horizontal and vertical, Guide line snapping may be used with a Corner graphic to easily connect two perpendicular lines. First simply add a corner graphic to the drawing, don't attempt to connect with initially creation of the corner. Then enable Guide Line snapping and orient the corner to be parallel to one of the lines. Then enable vertex snapping and connect the ends of the corner to the ends of the lines. |